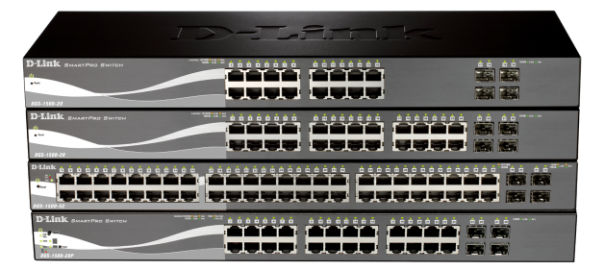
All posts by lieven

Extracting audio from a YouTube video using avconv

You can download YouTube videos with the NetVideoHunter Firefox add-on. After installing the add-on, you can download a YouTube video by clicking the icon.

netvideohunter-12

By default the add-on downloads the best available quality from YouTube, that is very convenient.

The downloaded file has an mp4 extension.  Using the libav command line tool avconv, you can extract the audio without transcoding. This way the process is very fast and the audio quality remains the same:

avconv -i testvideo.mp4 -codec copy -vn testaudio.m4a

The -codec copy option makes sure the audio is extracted without conversion an the -vn option excludes the video being written to the output file.

To install avconv on Debian:

sudo apt-get install libav-tools

Fix fraying shoelaces with heat shrink tubing

Normally the ends of shoelaces are protected with plastic caps to prevent them from fraying, but they sometimes break and get loose. Once the ends of shoelaces start fraying, it is very hard to put them through the tiny holes of your shoes.  This is an easy fix:

  1. Get some glue, the right size of heat shrink tubing and a heat gun (or a lighter)
  2. Put a little amount of glue on your finger and wet the ends of the fraying shoelaces with it.
  3. Cut a suitable length of heat shrink tubing and shove it over the end of the fraying shoelace.
  4. Apply heat with a heat gun and you are done!

Booting the Asus R556LA laptop from USB

UEFI makes it harder, but not impossible to boot your PC or laptop from USB:

  • Shut down Windows and wait until all status lights on the laptop are out.
  • Press the power button and press f2 (without the fn button depressed) to get into the BIOS (Aptio Setup Utility)
  • If the laptop keeps on booting Windows and does not want to go into BIOS, try shutting it down with a long press (5 seconds) on the power button to shut it down and then power it up and press f2
  • Boot > Fast Boot: Disabled
  • Boot > Lauch CSM: Enabled
  • Security: Secure Boot menu > Secure Boot Control: Disabled
  • Save & Exit > Save Changes and Exit
  • Press f2 again
  • Boot > Boot Option Priorities > Boot Option : Generic Flash Disk
  • optional: Boot > Boot Option Priorities > Boot Option #2: Disabled
  • Save & Exit > Save Changes and Exit
  • The laptop should now boot from USB

20 Watt Class A Power Amplifier

In the nineties I built a class A power amplifier based on an article in the November 1985 edition of the Dutch electronics magazine Radio Bulletin. In 2000 I reproduced the article on my web site and added photos and extra schematics for a stabilized power supply for the preamp stage. Although some of the components are probably not available and the original website is long gone (archived on the WayBackMachine), I found it useful to repost the Dutch article: Klasse A-versterker van 20 Watt

Adding the SomaFM XBMC Plugin to OpenELEC

I am a huge fan of SomaFM. I Have been listening to this listener-supported, commercial-free Internet-only streaming music station for years.

I do no only use my xbmc on Raspberry Pi (OpenElec) to watch movies, I regularly listen to music as well. So how can we add the wonderful ambient, jazz, loungy or indie tunes of SomaFM to xbmc? A quick search pointed to https://github.com/nils-werner/xbmc-somafm, but my OpenELEC lacked the git command.

Reluctant to install git on OpenELEC just for this, I performed this workaround

  • I first installed git with the default package manager on my Linux Destop (Synaptic on Debian)
  • Following the instruction in https://github.com/nils-werner/xbmc-somafm/blob/master/README.md, I downloaded the plugin with git to my desktop:
    git clone https://github.com/nils-werner/xbmc-somafm.git plugin.audio.somafm
  • I then archived and compressed the folder:
    tar cvzf plugin.audio.somafm.tgz plugin.audio.somafm
  • Transfered the .tgz file to the OpenELEC:
    scp plugin.audio.somafm.tgz root@openelec:/storage/.xbmc/addons/
  • Then logged in with ssh to the OpenELEC, and extracted the .tgz:
    cd /storage/.xbmc/addons/
    tar xvzf plugin.audio.somafm.tgz
    rm plugin.audio.somafm.tgz
    chown -R root:root plugin.audio.somafm/
  • After rebooting your OpenELEC you can find SomaFM under Music > Add-ons

Happy listening!

VirtualBox fixed after a new Linux kernel

Every time Ubuntu updates installs a new Linux kernel, your VirtualBox is likely to be broken. I got these error when starting my virtual machine:

The virtual machine 'xxx' has terminated unexpectedly during startup with exit code 1.

and

Kernel driver not installed (rc=-1908)
The VirtualBox Linux kernel driver (vboxdrv) is either not loaded or there is a permission problem with /dev/vboxdrv. Please reinstall the kernel module by executing
'/etc/init.d/vboxdrv setup'
as root. If it is available in your distribution, you should install the DKMS package first. This package keeps track of Linux kernel changes and recompiles the vboxdrv kernel module if necessary.

This is how I can solve it:

sudo apt-get remove virtualbox-dkms
sudo apt-get install linux-headers-`uname -r`
sudo apt-get install virtualbox-dkms

Tested on Ubuntu 13.04 with VirtualBox 4.2.10. Hope this keeps on working!

Seeed Studio EL Shield Review

Seeed Studio’s give-away

I am one of the lucky five who have received an EL shield from Seeed Studio’s first monthly give-away. I applied for the give-away because I have never worked with EL lighting before and I wanted to test if I could illuminate my bicycle with it. This post has a small introduction on EL lighting, how I used it to light my bicycle and finally a review of the Seeed Studio EL shield. Continue reading Seeed Studio EL Shield Review