
Practical information for my Aan de slag met ESPHome en HomeAssistant workshop at Fri3d Camp 2022. Still a work in progress…
Hardware list
- half bread board
- ESP32 board, for example the LOLIN32 lite
- USB A to micro cable
- Breadboard with 400 holes
- male/male jumper wires
- a reed switch
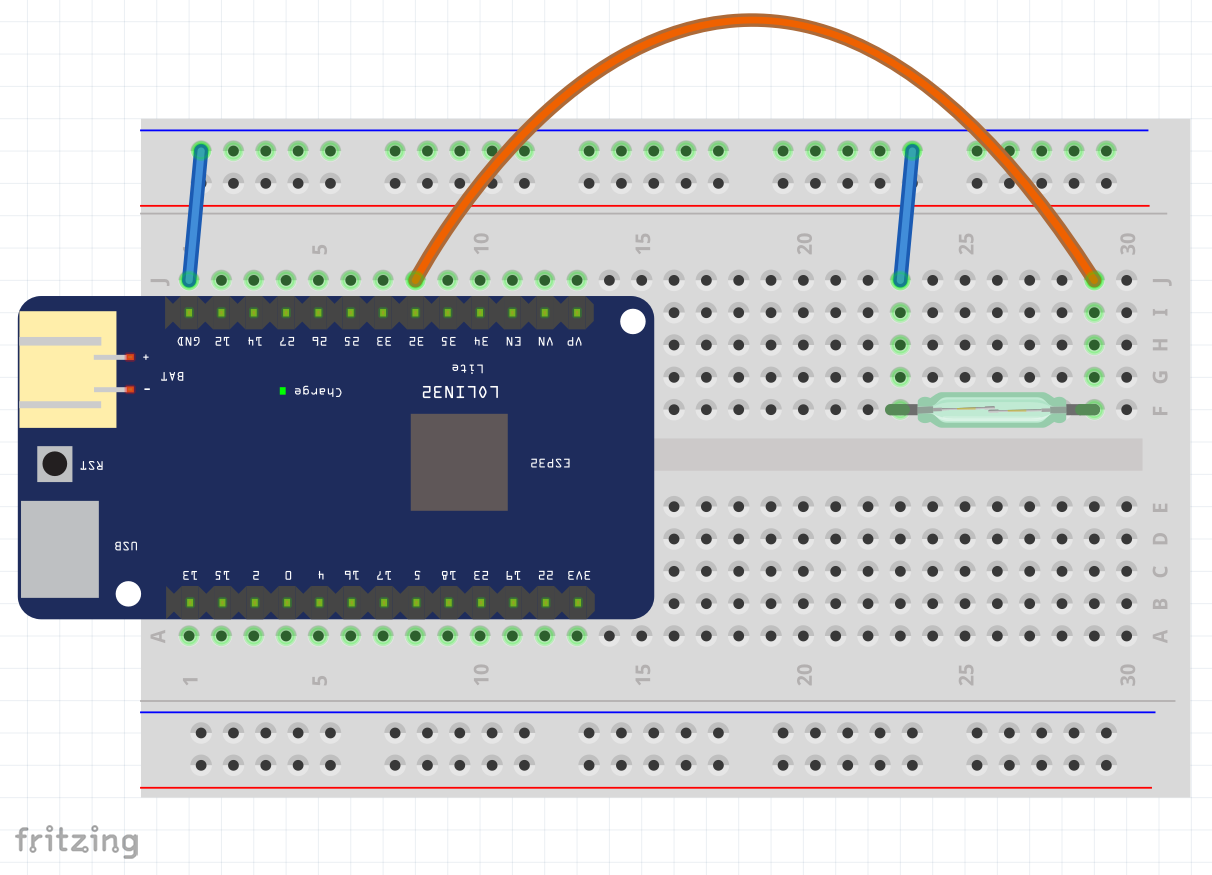
Hookup
Software setup
Browser
Open Chromium, Google Chrome of Microsoft Ege.
Ga naar web.esphome.io en volg de instructies op de pagina:
- Steek de USB kabel in jouw PC en het ESP32 bordje
- Klik op CONNECT
- Selecteer de juiste seriële poort. Op Linux is dat meestal
USB Serial (ttyUSB0) - Je zou
ESP Devicemoeten zien met statusCONNECTED - Klik op PREPARE FOR INSTALLATION
- Klik op MAKE ADOPTABLE
- Het installeren duurt ongeveer 2 minuten. Als het niet lukt kan het helpen om op het ESP bordje eens op het RST (reset) knopje te drukken
Woohoo, het ESP bordje heeft nu een basisversie van ESPHome. Om de configuratie verder te zetten kunnen we dat via WiFi doen.
Voor je de kabel uittrekt kan je eens de logs checken. Klik op LOGS en dan op het RESET DEVICE. Voorbeeld van logs:
[I][logger:214]: Log initialized
[C][ota:461]: There have been 2 suspected unsuccessful boot attempts.
[D][esp32.preferences:114]: Saving preferences to flash...
[I][app:029]: Running through setup()...
[C][esp32_ble:026]: Setting up BLE...
[D][esp32_ble:040]: BLE setup complete
[D][esp32_ble_server:033]: Setting up BLE Server...
[D][esp32_ble_server:070]: BLE server setup successfully
[C][wifi:037]: Setting up WiFi...
[C][wifi:201]: Setting up AP...
[C][wifi:203]:   AP SSID: 'esphome-web-19448c'
[C][wifi:204]:   AP Password: ''
[C][wifi:213]:   IP Address: 192.168.4.1
[D][esp32_improv.component:200]: Setting Improv to start
[C][web_server:095]: Setting up web server...
[C][ota:085]: Over-The-Air Updates:
[C][ota:086]:   Address: esphome-web.local:3232
[W][ota:095]: Last Boot was an unhandled reset, will proceed to safe mode in 8 restarts
[C][api:025]: Setting up Home Assistant API server...
[D][wifi:373]: Starting scan...
[I][app:062]: setup() finished successfully!
[I][app:102]: ESPHome version 2022.3.0 compiled on Mar 24 2022, 01:01:34
[I][app:104]: Project esphome.web version 1.0
[C][logger:233]: Logger:
[C][logger:234]:   Level: DEBUG
[C][logger:235]:   Log Baud Rate: 115200
[C][logger:236]:   Hardware UART: UART0
[C][esp32_ble:206]: ESP32 BLE:
[C][esp32_ble_server:160]: ESP32 BLE Server:
[C][esp32_improv.component:214]: ESP32 Improv:
[C][esp32_improv.component:216]:   Status Indicator: 'NO'
[C][captive_portal:088]: Captive Portal:
[C][wifi:491]: WiFi:
[C][wifi:353]:   Local MAC: 78:E3:6D:19:44:8C
[C][wifi:354]:   SSID: [redacted]
[C][wifi:355]:   IP Address: 0.0.0.0
[C][wifi:357]:   BSSID: [redacted]
[C][wifi:358]:   Hostname: 'esphome-web-19448c'
[C][wifi:360]:   Signal strength: 0 dB ▂▄▆█
[C][wifi:364]:   Channel: 1
[C][wifi:365]:   Subnet: 0.0.0.0
[C][wifi:366]:   Gateway: 0.0.0.0
[C][wifi:367]:   DNS1: 0.0.0.0
[C][wifi:368]:   DNS2: 0.0.0.0
[C][web_server:207]: Web Server:
[C][web_server:208]:   Address: esphome-web.local:80
[C][mdns:084]: mDNS:
[C][mdns:085]:   Hostname: esphome-web-19448c
[C][ota:085]: Over-The-Air Updates:
[C][ota:086]:   Address: esphome-web.local:3232
[W][ota:095]: Last Boot was an unhandled reset, will proceed to safe mode in 8 restarts
[D][esp32_improv.component:076]: Service started!
[C][api:138]: API Server:
[C][api:139]:   Address: esphome-web.local:6053
[C][api:143]:   Using noise encryption: NO
[C][improv_serial:032]: Improv Serial:
Het bordje zendt een uniek WiFi netwerk uit esphome-web-xxxxxx.
Prepare your device for adoption
This will install a basic version of ESPHome to your device and help you connect it to your network.
Command line
Ik kreeg de CLI installatie van esphome niet werkend met pip3/python op Debian 11.
Follow Installing ESPHome Manually for installing the ESPHome software using the pip3 command of python. The instructions are almost identical on Linux, Mac or Windows.
- Open a command window or terminal.
-
Make sure you are running a recent version of Python 3:
$ python3 --version
Python 3.7.1 -
Install ESPHome:
$ sudo apt install rustc
$ python3 -m venv esphome
source esphome/bin/activate
pip3 install setuptools_rust # was nodig op Debian 11
pip3 install --user esphome -
confirm that ESPHome has been successfully installed:
$ esphome version
Version: 2021.12.3
Getting Started
see Getting Started with the ESPHome Command Line
Home Assistant
We will continue configuring the ESPHome device from within Home Assistant. Home Assistant is not a requirement as you can run ESPHome as a stand alone device, but then you will need to instal the ESPHome software on your PC.
The workshop is running Home Asisstant on a Raspberry Pi 3B+.
Things after basic setup of Home Assistant:
- Change hostname for this workshop: Settings> Systeem > Network > Hostname:
ha-esp-fri3d Enable SSH: Settings > Add-ons > ADD-ON STORE> Terminal & SSH > INSTALL
Install the ESPHome Dashboard for Home Assistant:
- Settings > Add-ons >
ADD-ON STORE - Search for esp and Click on ESPHome >
INSTALL This could take some time. Check the Log tab:
[services.d] starting services
[services.d] done.
[17:03:17] INFO: Waiting for dashboard to come up...
[17:03:19] INFO: Starting ESPHome dashboard...
2022-08-06 17:03:23,694 INFO Starting dashboard web server on unix socket /var/run/esphome.sock and configuration dir /config/esphome...
[17:03:23] INFO: Starting NGINX...- For Easy access to the ESPHome Web UI, check
Show in sidebar - When you click ESPHome in the sidebar you should see “Welcome to ESPHome. It looks like you don’t yet have any devices”.
We will do the first connection and initialization of the ESP board:
- On the ESPHome Dashboard, click
NEW DEVICEandOPEN ESPHOME WEB - Click
CONNECT - Select the serial port. On Linux this could be
USB Serial (ttyUSB0)and clickConnect - You should see ESP Device with status
CONNECTED - Click
PREPARE FOR ADOPTION - Click MAKE ADOPTABLE
- If the connection does not work, try pressing the RST button on the ESP board shortly after clicking
Retry - When you get Confituration installed, click Close
- You will see a device ID like
esphome-web-5df3c4,this is the WiFi network the ESP device is now transmitting. - Click
CONNECT TO WI-FIto configure the ESP device to connect to the Fri3d Camp WiFi network - Select the Network, enter the password and CONNECT
- When you get Provisioned, You can click CLOSE.
An alternative way to configure the WiFi settings of the ESP device:
(instructions go here)
Your newly configured ESP board shoud be visible in the ESPHome dashboard of Home Assistant with status DISCOVERED.
- Click ADOPT to add the device.
- Again, you will need to enter the WiFi network and Password and click ADOPT
- You could give the device a new name then click INSTALL.
- We get a terminal like window that shows esphome installing on the ESP device. The first time ESPHome will download the necessary toolchain. This will also happen when there are new versions.
- You can click STOP when the installation has completed
Example of a succesfull upload:
INFO Successfully compiled program.
INFO Resolving IP address of esphome-web-5df3c4.local
INFO  -> 192.168.1.5
INFO Uploading /data/esphome-web-5df3c4/.pioenvs/esphome-web-5df3c4/firmware.bin (889088 bytes)
Uploading: [============================================================] 100% Done...

INFO Waiting for result...
INFO OTA successful
INFO Successfully uploaded program.
INFO Starting log output from esphome-web-5df3c4.local using esphome API
INFO Successfully connected to esphome-web-5df3c4.local
[15:01:30][I][app:102]: ESPHome version 2022.6.2 compiled on Aug  7 2022, 14:58:08
[15:01:30][C][wifi:491]: WiFi:
[15:01:30][C][wifi:353]:   Local MAC: 10:52:1C:5D:F3:C4
[15:01:30][C][wifi:354]:   SSID: [redacted]
[15:01:30][C][wifi:355]:   IP Address: 192.168.1.5
[15:01:30][C][wifi:357]:   BSSID: [redacted]
[15:01:30][C][wifi:358]:   Hostname: 'esphome-web-5df3c4'
[15:01:30][C][wifi:360]:   Signal strength: -85 dB ▂▄▆█
[15:01:30][C][wifi:364]:   Channel: 11
[15:01:30][C][wifi:365]:   Subnet: 255.255.255.0
[15:01:30][C][wifi:366]:   Gateway: 192.168.1.254
[15:01:30][C][wifi:367]:   DNS1: 192.168.1.254
[15:01:30][C][wifi:368]:   DNS2: 0.0.0.0
[15:01:30][C][logger:275]: Logger:
[15:01:30][C][logger:276]:   Level: DEBUG
[15:01:30][C][logger:277]:   Log Baud Rate: 115200
[15:01:30][C][logger:278]:   Hardware UART: UART0
[15:01:30][C][captive_portal:088]: Captive Portal:
[15:01:30][C][mdns:084]: mDNS:
[15:01:30][C][mdns:085]:   Hostname: esphome-web-5df3c4
[15:01:30][C][ota:085]: Over-The-Air Updates:
[15:01:30][C][ota:086]:   Address: esphome-web-5df3c4.local:3232
[15:01:30][C][api:138]: API Server:
[15:01:30][C][api:139]:   Address: esphome-web-5df3c4.local:6053
[15:01:30][C][api:143]:   Using noise encryption: NO
When the initial installation is complete you should see your ESP board with status ONLINE in the ESPHome dashboard.
Hello World!
To change the configuration just click EDIT on the appropriate device in the ESPHome dashboard.
After the initial installation of our ESP board, ESPHome has already provided a basic configuration:
esphome:
  name: esphome-web-5df3c4

esp32:
  board: esp32dev
  framework:
    type: arduino

# Enable logging
logger:

# Enable Home Assistant API
api:

ota:


wifi:
  ssid: !secret wifi_ssid
  password: !secret wifi_password

  # Enable fallback hotspot (captive portal) in case wifi connection fails
  ap:
    ssid: "Esphome-Web-5Df3C4"
    password: "NOwVoHqNA8CI"

captive_portal:
The ap and captive_portal option make sure the ESP board wil act as a WiFi access point if it can not connect to the configured WiFi (e.g. because a bad password). This is a log of this situation:
[W][wifi:442]: No matching network found!
[W][wifi:572]: Restarting WiFi adapter...
[I][wifi:136]: Starting fallback AP!
[C][wifi:201]: Setting up AP...
[C][wifi:203]:   AP SSID: 'Esphome-Web-5Df3C4'
[C][wifi:204]:   AP Password: 'NOwVoHqNA8CI'
[C][wifi:213]:   IP Address: 192.168.4.1
We will add the configuration for a magnetic reed switch by adding this “code” to the bottom of the file:
light:
  - platform: binary
    name: "LED-5df3c4"
    output: light_22
    id: LED

output:
  - id: light_22
    platform: gpio
    pin: GPIO22 # this is the built in LED next to 22 on the LOLIN32 lite board
    inverted: true # the LED turns on when the output goes LOW

binary_sensor:
  - platform: gpio
    pin:
      number: 32
      mode:
        input: true
        pullup: true
    filters:
      - invert:
    name: "magnet-5df3c4"
    on_press:
      then:
        - light.turn_on: LED
    on_release:
      then:
        - light.turn_off: LED
While we are busy, we can also change the basic configuration by specifying the board model we are using:
esp32:
  board: lolin32_lite
Some YAML explanation? Not a programming language but a data/markup language. Indentation is important!
Click INSTALL and Wirelessly to update your board. Updating wirelessly means that the device no longer needs to be tethered to the computer, you can power it with a USB power brick/charger, power bank or solar panel.
Note that building the code and uploading takes about 5 minutes, that is a bit slow. This is partially because we are using a Raspberry Pi 3. On a Pi 4 this should run faster. Another alternative is running Home Assistant on a virtual server.
Note that the editor is “smart”, when we try to configure pin 35 it complains by marking the line with a red cross. When you hover over it, we get the explanation: GPIO35 (34-39) does not support pullups.
After uploading the code we can see the state of the inputs change when we move a magnet close to the reed switch.
An Example of measuring Gas and Water usage by sensing the magnetic pulses generated by the counter in the utility meter:
  - platform: pulse_counter
    pin: 26
    name: "Gas"
    id: gas_l
    unit_of_measurement: 'L/min'
    filters:
      - multiply: 10 #1 pulse per 0,01m³
    update_interval: 1200s
    accuracy_decimals: 1
    icon: mdi:counter
    device
  - platform: pulse_counter
    pin: 25
    name: "Water"
    unit_of_measurement: 'L/min'
    filters:
      - multiply: 0.5 #2 pulses per litre = 2000 pulses per m³
    update_interval: 300s
    accuracy_decimals: 1
    icon: mdi:water
Configuring the ESP is all good, but how do we get sensors and stuff into Home Assistant. For this we need the ESPHome Integration.
So think of the ESPHome Dashboard as the “configuration manager” for your ESPHome boards and the ESPHome Integration as the “link” for the ESPHome boards to Home Assistant.
To install the integration:
- You should see a new notification in Home Assistant: “We have discovered new devices on your network.”
- Click on
Check it out - This should take you to the Integrations page and should show an “discovered” device.
- Click on CONFIGURE and SUBMIT
- You can optionally assign the device to an area. This can be useful.
Checking the device you should see 2 entities: LED and Magnetic reed switch. These entities are also automatically added to the “Overview” in Home Assistant.